
Isuzu Trek Members Infoletter #37
Fall (Dec) 2015
Index:
Exhaust Manifold Fasteners, Turbo Heat Shield, Brake Light Switch, LED Conversion Shower Valve Replacement, Electromagic Bed Revisited
Exhaust Manifold Fasteners, Bret and Laura Medbury, Whidbey Island, WA (islandduo at comcast.net), remember to replace (at) with @ in the email addresses)
I had been warned by other Isuzu Trekkers that the cap screws used to fasten the forward and aft ends of the exhaust manifold to the engine block were prone to breaking and it would be worth my while to change them out and replace with studs before they broke. One of the warning population was the publisher of this prestigious and informative newsletter. Did I heed this advice?? Obviously not.
At approximately 120,000 miles I started noticing the typical tic-tic sound of an exhaust leak, especially under load, to discover the forward top exhaust manifold retaining bolt was gone, but the threaded end was still in the block. Once the bolt is broken, removal of the manifold is necessary first to remove the piece and second to replace the manifold gasket. I removed the manifold complete with the turbo installed. Luckily all other bolts and nuts came off without a problem although maybe liberal amounts of PB Blaster helped. All four locations (two front and two rear) were replaced with studs, new gaskets installed, and manifold re-torqued to the book. OBTW if you ever remove this manifold understand they are very prone to warping. Check them with a straightedge and replace if warped. I lucked out. Click here to see the following pictures:


If I had heeded the experts advice I am sure this job could have been reduced to minutes. Just remove a cap screw, replace with a stud, torque and then move to the next. Oh well, I guess I like working on the Trek.
Turbo Heat Shield
While I was repairing the broken exhaust manifold stud I discovered the turbo heat shield cracked in several places and also a burned/charred spot on the underside of the floor directly above the turbo. There is also a wiring harness in that area that needs protection.
Solution was to fabricate a new double layer heat shield to reduce radiated heat in the area. Photos show the result and also the spot that was the cause for concern.
I suggest you all take a look to see if you might have the same issue. Construction was just a matter of trial and error (mostly error) using pieces of scrap sheet metal. Half of it (inner layer) is made from the Trek’s original hot water heater metal sheathing. New heaters don’t have this sheathing.


Brake Light Switch
Twice in the time I have owned my 1993 Isuzu (1992 chassis) I have discovered the brake lights did not turn off when the pedal was released. The first time I discovered there was a dent/hole in the rubber pad located on the brake pedal arm which contacts the brake light switch plunger. The hole was not quite centered so I simply rotated the pad on its center retaining tab which presented a new surface and all was well.
Approximately 30K miles later I discovered the light was again not shutting off. This time the rubber pad had split and fallen off completely, leaving just the center retaining tab in place. Click here to see the Pad photo. Since we were on the road a temporary fix was incorporated using a wooden clothes pin to replace the pad. Click here to see the Temp photo. Permanent fix after returning home was to cut a chunk from a used serpentine belt (not a Trek part) and glue it to the surface that had previously had the rubber pad. 🙂 Click here to see the Fix photo. The rubber of the old pad just died of old age.
LED Conversion Anyone interested in inexpensively converting all their Trek interior lighting to LEDs to increase battery life or reduce heat generation contact Bret and Laura at islandduo (at) comcast.net for details and photos.
Bret and Laura Medbury
Shower Valve Replacement, Henry, (acudoc888 at gmail.com)

I replaced my shower faucet and had to do it from inside the shower. My arms couldn’t reach them from behind. I cut out the old one and purchased some white plastic to cover the hole.
 The storage on my coach next to the drivers side seat was
  almost useless. I raised it up like the later Treks so it could be reached easily. I cut out holes for a cup and miscellaneous, and increased their depth. Works great.
Editor- Thanks, Henry for the new input on how to replace the shower valves. Ive looked at that access cover way back under the cabinets and wondered how anyone could ever get to them.
Electromagic Bed Revisited, Ken Harmon, (IsuzuTrek at aol.com)
It may be time to revisit the unique Trek Electromagic bed. I have received several inquiries from people who are new to the Isuzu Trek and want information about the bed. Some of the inquiries occurred while we were on the road and I was unable to make timely responses with technical information.
We have used our Trek as half-timers for the last 16 years; thats 8 full years on the road with at least 182 bed cycles per year or close to 3,000 total bed cycles. If you are like us, you press the button and hope things will still work like they should. As many of you know, early in the life of the Isuzu Treks there was a problem with the soft pot-metal mounting end of the Somfoy bed motor failing. The fix was a new steel bracket attached to the end of a new Somfoy motor and a new steel mounting bracket added to the inside wall of the bed.
The Infoletters have several stories about the bed and repairs. I still carry two ratcheting cargo straps (Harbor Freight), just in case. The straps can be looped over the top of the gear tracks and across under the bed to raise and hold it up. Once our bed was fixed properly, it has worked fine.
To help understand how the bed was built click here for a factory drawing.
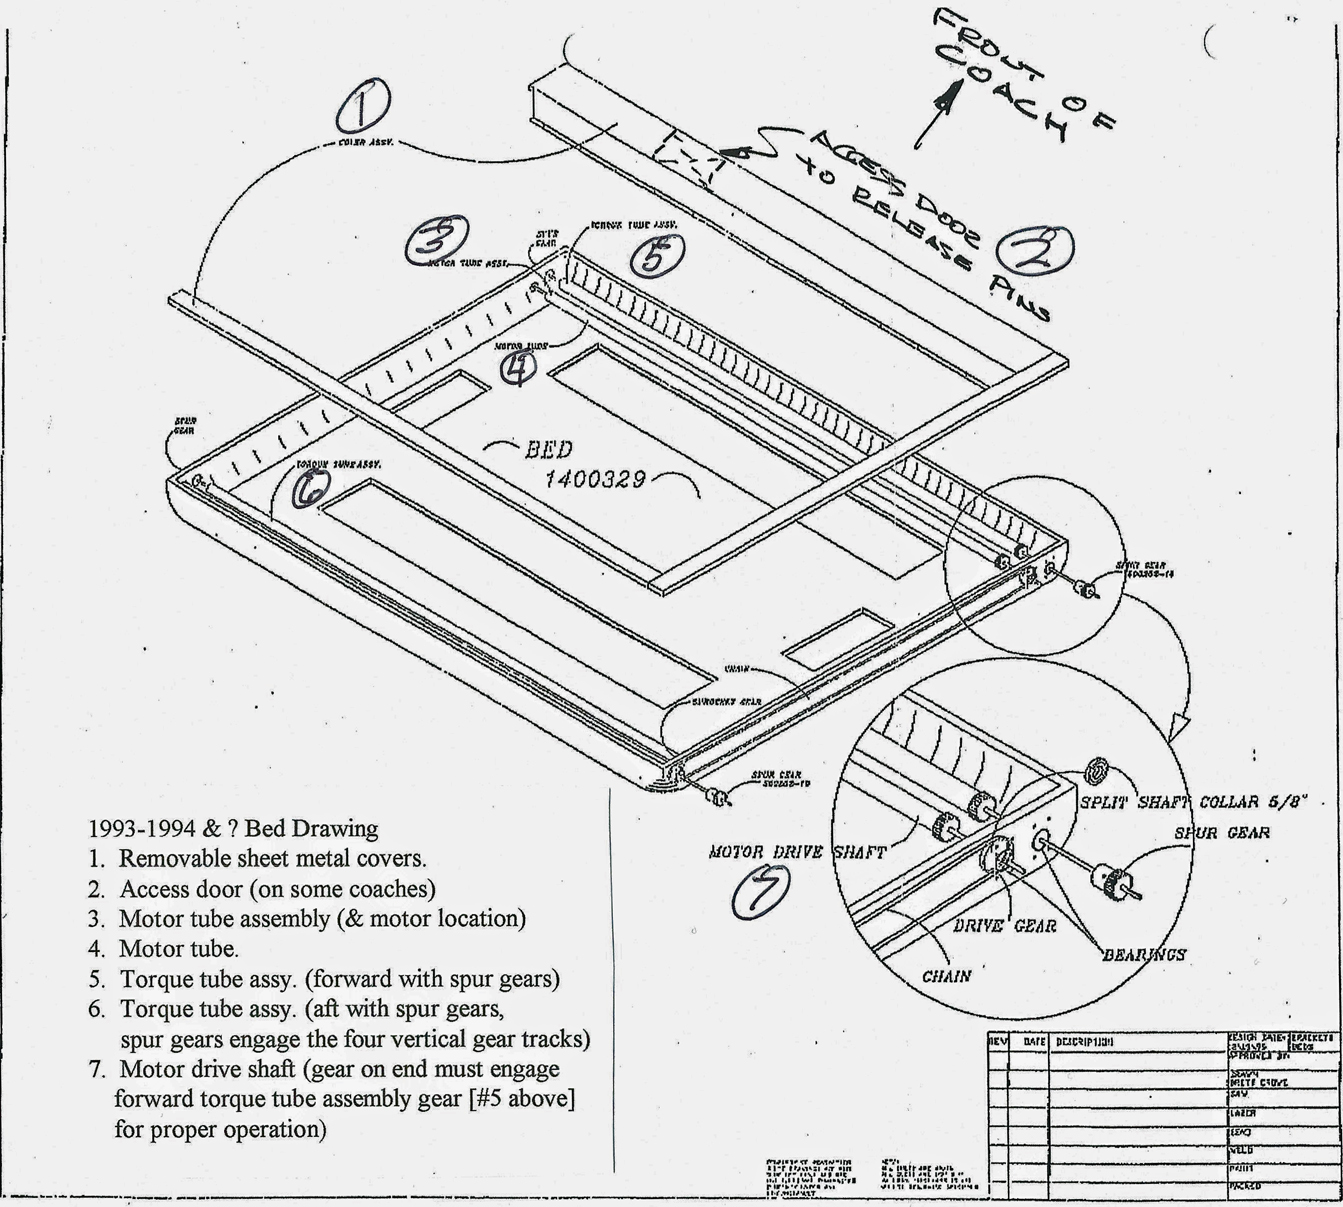
It shows the internal workings and you should be able to print it in landscape for your maintenance file.
Editor: I will be signing off as the editor now, but I look forward to reading the new Infoletters and I plan to contribute input so we can all enjoy our Treks.
See you down the road.
Ken & Cathy